
How to Grow Carrot Microgreens Fast and Easy
The rabbits are onto something – carrot tops taste amazing! Well, at least carrot microgreens do.
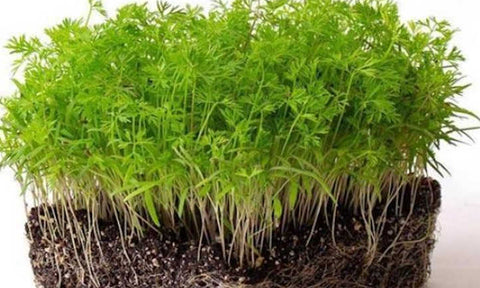
These young greens, fresh from the seed, have a mild carrot taste and delicate texture that you’ll love. They’ll add flavor to your plate and green to your garden!
Carrot microgreens are one of the slowest microgreens you can grow (if you want something faster, try radishes or mustard). Depending on the variety, it’s usually 15-25 days until harvest. However, that’s still under a month of growing, which is a great deal shorter than waiting for a mature vegetable plant. Plus, the unique taste and texture make this microgreen worth the wait.
Even though they take longer, carrot microgreens are grown just like most other microgreens. You’ll be able to reuse most of the supplies and continue growing microgreens of all sorts! For now though, let’s go over how to get those fresh carrot microgreens.
Finger Lime Tree: The Caviar of Citrus
You only need a few basic things to start growing microgreens. Then, you can plant, grow, and harvest your healthy treats!
Materials
- Seeds: choose some good-quality carrot seeds (all varieties should grow successfully as carrot microgreens). This carrot microgreens mix from True Leaf Market is a great option.
- Containers: a shallow container with holes for water plus another that’s the same size or larger without holes
- Growing medium: we love using Espoma seed starter mix for most microgreen varieties
- Light: you can’t go wrong with a T5 grow light
- Kitchen shears
Because carrot microgreens are just immature carrot plants, you don’t need a special type of seed. Some companies may market their seeds for microgreens, but any quality carrot seed will do the trick. Carrots grow super tiny seeds, so make sure you have enough to cover the whole surface of your growing tray.
It’s tempting to save money by skipping the grow light. However, if you want to get quality microgreens you shouldn’t. Each microgreen crop needs to grow directly below the light source to ensure optimal flavor and even growth. While sunlight gets the job done in a pinch, it usually results in leggy, lackluster microgreens.
Soaking
Carrot seeds are so tiny that they absorb water just fine from the soil. You can skip this step.
Planting
Start by grabbing your seed-starting soil and tray with drainage holes. Fill the grow tray almost to the brim with soil, thoroughly water the soil, and smooth out the surface. Then, spread the microgreen seeds all across the tray. Try to cover the entire soil surface without letting the microgreen seeds overlap. This is no small task with such tiny seeds, so we recommend using a salt shaker to disperse them.
Gently press the microgreen seeds into the soil so they’ll stay in place. The seeds will start absorbing water from the soil and begin germination. If you’d like, you can add a heating mat underneath the growing tray. The ideal soil temperature for germinating this plant is 75° F.
Once the microgreen seeds are planted, we’re going to induce a blackout period so they can grow. Grab your second, hole less tray and place it on top of the growing tray. It should block out all light for the microgreen seeds. If needed, place a weight on top of the tray (up to 5 pounds).
Carrot seeds will germinate and start to grow in 4-7 days. It’s important that you keep the tray covered the entire time. The soil should have enough water that you won’t need to add more during the blackout period.
Growing
About 4 days after the microgreen seeds are planted, peek in to see if they’ve sprouted. When at least 80-90 percent of the seeds have grown small, white shoots, you can remove the cover tray. Place the growing tray about 1-3 feet below the grow light and turn it on for about 12 hours a day. You should also remove the heating mat, if you used one.
The microgreen sprouts will turn green and grow towards the light. While they’re growing, water the soil consistently. The carrot microgreens will demand more water the more they grow. Instead of reaching for the watering can though, microgreens should be watered from the bottom up.
To water the carrot microgreens, you’ll need the second tray again. Fill it with an inch or two of water and set the microgreen growing tray in it. Let the growing medium soak up the water for about 10 minutes and then remove it. This method keeps the leaves on the microgreens dry and thus protected from bacterial growth.
Harvesting